How to make a Blog Button/Badge
Want your very own blog badge, but you don't want to pay somebody and astronomical amount of money to make you one. That's what I said this last week too, so I began to dig, and dig and finally I found instructions on how to make one and put "code" to it. Then I had to dig some more to find instructions on how to make a "code box" to put underneath, which allows people to "grab " your badge/button and add it to their pages. If your like me you thought all this was one easy breezy step-nope. Its a pain. The neat thing though with this is it does not have to just be a badge that leads to your blog/site. I have seen other bloggers use them for an event they are holding or a particular post they want to show off! As best as I can, I'm going to explain to you how to make your own blog badge...and then at the HTML code to make it active. I know this works for adding to Blogger or blogs that accept Javascript/HTML codes.
1. Okay, start by designing/making/creating a button. This is the easy part, use your favorite picture, text, or graphics. Jazz it up a little by using a photo-editing program to add text, frames, fun graphics, etc. You don't have to buy a fancy program (but use it if you have it). I like to do my editing and other fun stuff at Google Plus photos. Be sure to "resize" your picture to a good blog badge size. For mine I used 150*150. Also because if it's a badge that people will possibly add to their side bars, it may exceed space limits and be "cut off" when viewing the page, so you might want to limit your sizes to no more than 200X200, or so the recommnedation goes. If the program you're using to make your badge doesn't allow you to resize, then you should definitely be using either photobuclket or google plus phots! Once you are satisfied with the look of your soon-to-be button, save it to Photobucket*. Photobucket is free to use and quick to set up. I'll use mine as an example:

2. Now it's time to add the HTML code to the badge you've created! Okay, after you've saved your picture to your Photobucket account, click on the picture. You should be on a page where just that picture is showing on the left side of your screen. If you were not able to resize it before you saved it, NOW is the time to do it. Click resize and set it to the size you want it to be (see above). Re-save the picture once you've done this. Save it IN PLACE OF the bigger one you just shrunk. This will save you from confusing them in the future. You are now looking at the page and you will see a box that looks like this:
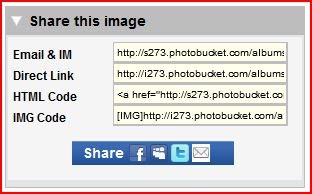
Copy and paste the HTML line (third line) into a word document. It will look like this:
<a href="http://s1312.photobucket.com/user/jenngreene1014/media/thCA3BPA935_zps23597fbd.jpg.html" target="_blank"><img src="http://i1312.photobucket.com/albums/t522/jenngreene1014/thCA3BPA935_zps23597fbd.jpg" border="0" alt=" photo thCA3BPA935_zps23597fbd.jpg"/></a>
What you want to do next is delete what is in between the first set of parenthesis...
<a href="http://s1312.photobucket.com/user/jenngreene1014/media/thCA3BPA935_zps23597fbd.jpg.html" target="_blank"><img src="http://i1312.photobucket.com/albums/t522/jenngreene1014/thCA3BPA935_zps23597fbd.jpg" border="0" alt=" photo thCA3BPA935_zps23597fbd.jpg"/></a>
...and replace it with the address/link to the page you want people to end up on when they "click" on your badge. It should look like this when you're finished:
<a href="http://www.pirategrl1014.blogspot.com" target="_blank"><img src="http://i1312.photobucket.com/albums/t522/jenngreene1014/thCA3BPA935_zps23597fbd.jpg" border="0" alt=" Home-Schooling Greene Style"/></a>
Also,
if you don't title your picture on Photobucket, the part between the
last set of parenthesis will just say Photobucket. No biggie. Erase
the words only and replace with the name of your page or whatever. But,
it's not necessary.
3. Now that you have code for your badge/button, it's time to add a code box to the mix, so that other people can "grab" your button! Copy and paste the following code into the document you're working from *UPDATE- I can't actually type the code out, because it automatically turns into a code box, so what I did was take a picture of it, and you can just copy it down and then proceed. Sorry about that =( ...if I can figure out how to actually type it out so you can copy and paste, I'll change that!:

You will then copy and paste the first, completed code you made into the area between the > < , deleting what is between there now, to look like this:
<textarea name=”textarea” cols=”20” rows=”4+
Warp=”VIRTUAL”><ahreff=http://www.pirategrl1014.blogspot.com”
Target=”_blank”><img
src="http://i1312.photobucket.com/albums/t522/jenngreene1014/thCA3BPA935_zps23597fbd.jpg"
border="0"
alt=" Home-Scholing Greene Style
"/></a>/textarea>
4. The final step is the put the two codes together. Still with me? You're almost there...promise. Get to a clear space on your document, because this is it...it's all you'll need in the end. Copy and paste the first code you made (the one that leads to the picture) into the clean space. Then copy and paste the second code you made (the code box) directly under the first. Be sure to hit 'enter' after first code, so that your button sits on top of your code box. The final result should look something like this:
<a href="http://pirategrl1014.blogspot.com/" target="_blank"><img alt="Home-Schooling Greene Style" src="http://i1312.photobucket.com/albums/t522/jenngreene1014/ed76d2f1-3510-4c4c-a9eb-a49bd7e89479_zps97309bf4.jpg" border="0" /></a>
<textarea rows="4" cols="20" name="textarea" wrap="VIRTUAL"><a href="http://pirategrl1014.blogspot.com/" target="_blank"><img border="0" alt="Home-Schooling Greene Style" src="http://i1312.photobucket.com/albums/t522/jenngreene1014/ed76d2f1-3510-4c4c-a9eb-a49bd7e89479_zps97309bf4.jpg"/></a></textarea>
5. Installing on your blog... Click the 'Design' or 'Layout' option (whichever your screen says...depends on version, I think) for your blog.

Click 'Add a Gadget'.

Click 'HTML/Javascript'.

Paste your entire code into the box, title it, and click 'SAVE'.
.bmp)
Now, drag it up or down to put it where you want it located on your sidebar and hit save. Now, view your blog. It'll look something like this:
.bmp)
That wasn't so hard, was it? Yea I know it took me almost 3 hours to figure it all out and get it right, but I was very proud at the end :) It's a lot of steps, but once you've done it a few times, you'll be able to do it without even thinking! I hope this helps somebody out there. Enjoy!
Comments